You finally decided the tub has to go. Or the old shower stall feels like a closet. Either way, you are searching for walk-in shower remodel ideas because you need more than a photo gallery you need to know what actually fits in your bathroom, what materials hold up, and what decisions to make before a contractor shows up.
This guide covers every decision in that sequence: dimensions first, then layouts, tile, glass, storage, fixtures, conversion, and accessibility with the reasoning behind each recommendation, not just the outcome.
Four Numbers Every Walk-In Shower Renovation Starts With
Before choosing a layout or a tile, measure your bathroom against these four specifications. They determine what is physically possible before any design decision is made.
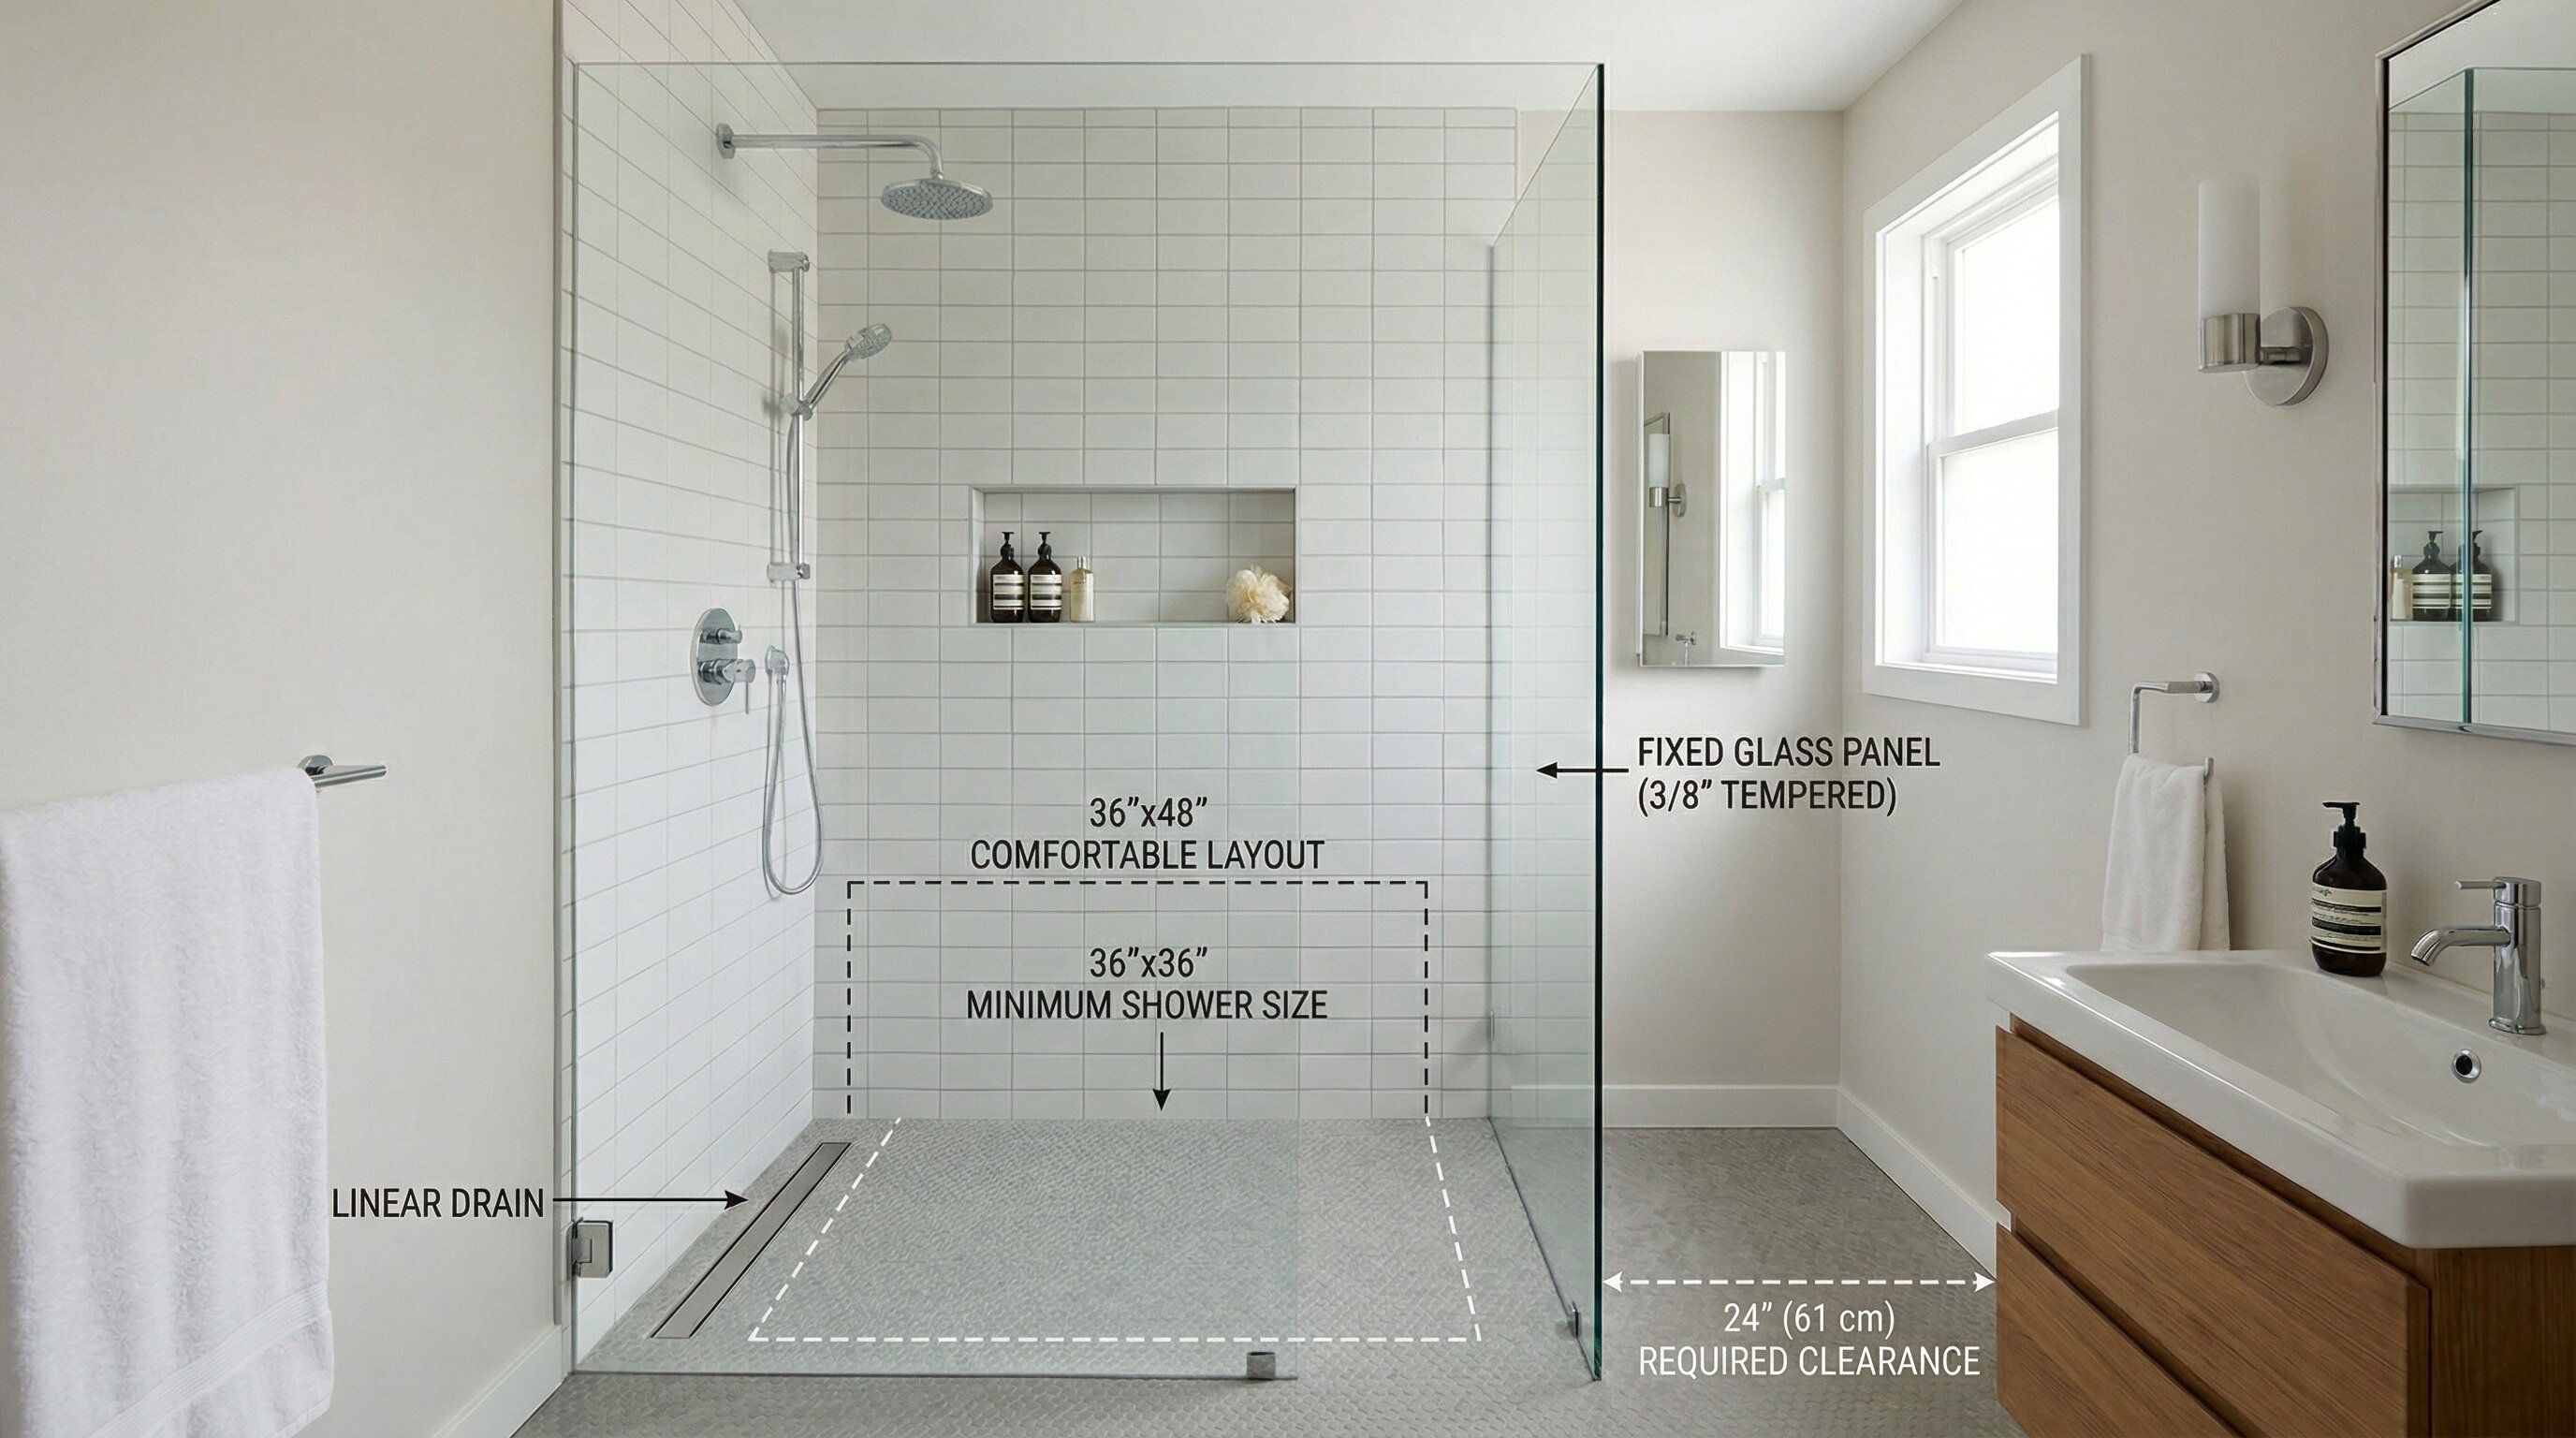
36×36 inches is the International Building Code minimum floor area for a walk-in shower. It is functional but tight. It works best for doorless or curbless designs where the absence of a door swing compensates for the limited floor area.
36×48 inches is the practical comfortable footprint for most single-person shower remodels. This is the minimum size most designers recommend for a doorless configuration. The 48-inch depth provides enough distance from the open entry to contain spray without a curb or door.
17 to 19 inches is the ADA-compliant bench height from the floor. This applies to both built-in tiled benches and freestanding teak stools.
24 inches is the NKBA minimum clear floor space required in front of the shower entry. In small bathrooms, this clearance often determines which wall the shower can occupy before any layout is chosen.
These four numbers are the filter through which every layout option below should be evaluated.
Walk-In Shower Layout Ideas for Small Bathrooms
Small bathroom walk-in shower ideas are not about shrinking the design. They are about choosing the configuration that uses the available footprint without wasting it.
Corner Walk-In Shower
A corner shower uses two existing walls as two sides of the enclosure. It requires only one glass panel and one new shower wall. This reduces material cost and visual weight. It also creates a natural wet zone where water is contained by solid walls without additional containment strategy.
The center of the bathroom stays open. That space can be used for a vanity or toilet, making a compact bathroom feel organized rather than crowded.
Alcove Walk-In Shower
An alcove shower sits between three walls with one glass panel at the front. Because three surfaces already exist, construction is limited to the front enclosure.This keeps costs lower than any other configuration. The alcove layout uses the full wall-to-wall width of the bathroom, which is the most effective use of a narrow footprint.
The back wall becomes a natural location for a built-in bench or recessed niche.
Doorless Walk-In Shower
Removing the door eliminates the swing radius. This recovers six to eight inches of usable floor space in a small bathroom walk-in shower remodel.
A single fixed glass panel defines the boundary and stops most of the spray. The showerhead must mount on the wall farthest from the open entry. This directs water away from the opening while the floor slope carries it to the drain. A minimum 36×48 footprint is required for doorless configurations to contain spray effectively.
Curbless Walk-In Shower
A zero-entry or barrier-free shower eliminates the threshold entirely. The floor slopes toward the drain at one-quarter inch per foot. A linear drain placed at the wall allows that slope to run in a single direction. This simplifies tiling and produces a cleaner visual result.
A center drain requires a four-directional slope and creates a subtle bowl underfoot. The waterproofing membrane must extend a minimum of six inches beyond the shower perimeter at floor level. The curbless design is both a space-expanding visual choice and the foundation of any accessible walk-in shower.
Walk-In Shower Tile Ideas: Materials, Size, and Grout Logic
Large Format Tile
Large format tile 12×24 inches or larger produces fewer grout lines than smaller formats. Fewer grout lines make the wall read as a continuous surface rather than a grid.
This makes the shower feel larger. Rectified tiles use a grout joint of one-sixteenth to one-eighth of an inch, which minimizes the grid effect further. Less grout also means less area for mold and soap scum to accumulate.
Extending the same tile from the shower floor onto the bathroom floor removes the visual boundary between the two zones. The transition requires a Schluter strip at the threshold to protect the tile edge and accommodate any height difference.
Porcelain, Ceramic, and Natural Stone
Porcelain tile has a water absorption rate below 0.5 percent per ANSI A137.1. It is the best-performing material for shower floors and walls. For floors, a slip resistance rating of R10 or above provides adequate grip on wet surfaces.
Ceramic tile is adequate for shower walls. Its higher absorption rate makes it a weaker choice for floors.
Natural stone requires sealing every one to two years. This prevents water penetration and surface degradation but makes it a high-maintenance option.
Pebble floor tile adds grip and texture. It also increases grout per square foot, which amplifies cleaning and sealing requirements.
Grout Color and Tile Orientation
Matching grout color to tile makes the grid pattern disappear. The surface reads as continuous and the shower feels larger.
Contrasting grout makes the grid visible. The space feels more defined and smaller.
Vertical tile orientation pulls the eye upward along the grout line. This makes the ceiling feel higher.
When the ceiling is already tall, run the tile horizontally. This expands perceived width instead of height.
Glass Enclosure Options: Frameless, Semi-Frameless, and Framed
Frameless glass uses three-eighths to one-half inch tempered glass panels with no surrounding metal frame. The absence of a frame removes the visual boundary line.
This allows the shower and bathroom to read as one continuous space. It also removes common buildup points, making maintenance easier. The cost is the highest.
Semi-frameless glass uses metal at the top and bottom only. It sits between frameless and framed in both cost and visual weight.
Framed glass surrounds the panel on all four sides. It is the most budget-friendly option but creates the strongest visual boundary and the highest maintenance surface area.
Tinted or frosted glass trades openness for privacy. It is more suitable for master bathrooms than shared spaces.
A shower curtain liner needs replacement about every six months. This creates recurring cost and mold risk. Glass is a one-time investment with lower long-term maintenance.
Walk-In Shower Ideas With Bench, Niche, and Storage
Built-In Bench
A built-in tiled bench must be planned during the substrate phase. It cannot be added after tile is installed without demolition. Correct dimensions are 17 to 19 inches high and 17 to 20 inches deep. All surfaces require full waterproofing treatment.
Teak Shower Stool
A teak freestanding stool is the right alternative when space or budget is limited. Teak’s natural oils repel moisture without applying sealant. It can be moved in and out easily, which also simplifies cleaning the shower floor.
Recessed Shower Niche
A recessed niche must be planned during framing before wall substrate installation. All five interior surfaces require waterproofing. Place the niche on an interior wall only. Exterior walls contain insulation and moisture barriers that can cause condensation problems if breached. A niche uses zero floor space, making it the most efficient storage option.
Fixtures: Drains, Showerheads, and Valves
Linear Drain vs Center Drain
A linear drain placed at the wall enables a single-direction floor slope. This simplifies tiling and produces a cleaner finish. A center drain requires a four-directional slope. This creates a more complex tile job and a subtle bowl shape underfoot.
Showerhead Options
Rainfall Showerhead
A rainfall showerhead creates wider water coverage and a spa-like experience. It requires adequate water pressure. Homes with low pressure may need a pressure-compensating valve or a dual system. Ceiling-mount installation requires rough-in planning before tile work.
Handheld Showerhead
A handheld showerhead provides flexibility for seated bathing and targeted coverage. It also helps clean grout lines and the shower floor without full exposure to spray.
Valve Types
A pressure-balancing valve prevents temperature spikes when another fixture runs. A thermostatic valve maintains precise temperature regardless of pressure changes. It is recommended for accessible showers and households with children or elderly users.
Matching Hardware Finishes
Match hardware finish across showerhead, valve trim, door handle, grab bar, and towel bar. Matte black, brushed nickel, polished chrome, or brushed gold each read as intentional when applied consistently. Mixed finishes feel unplanned.
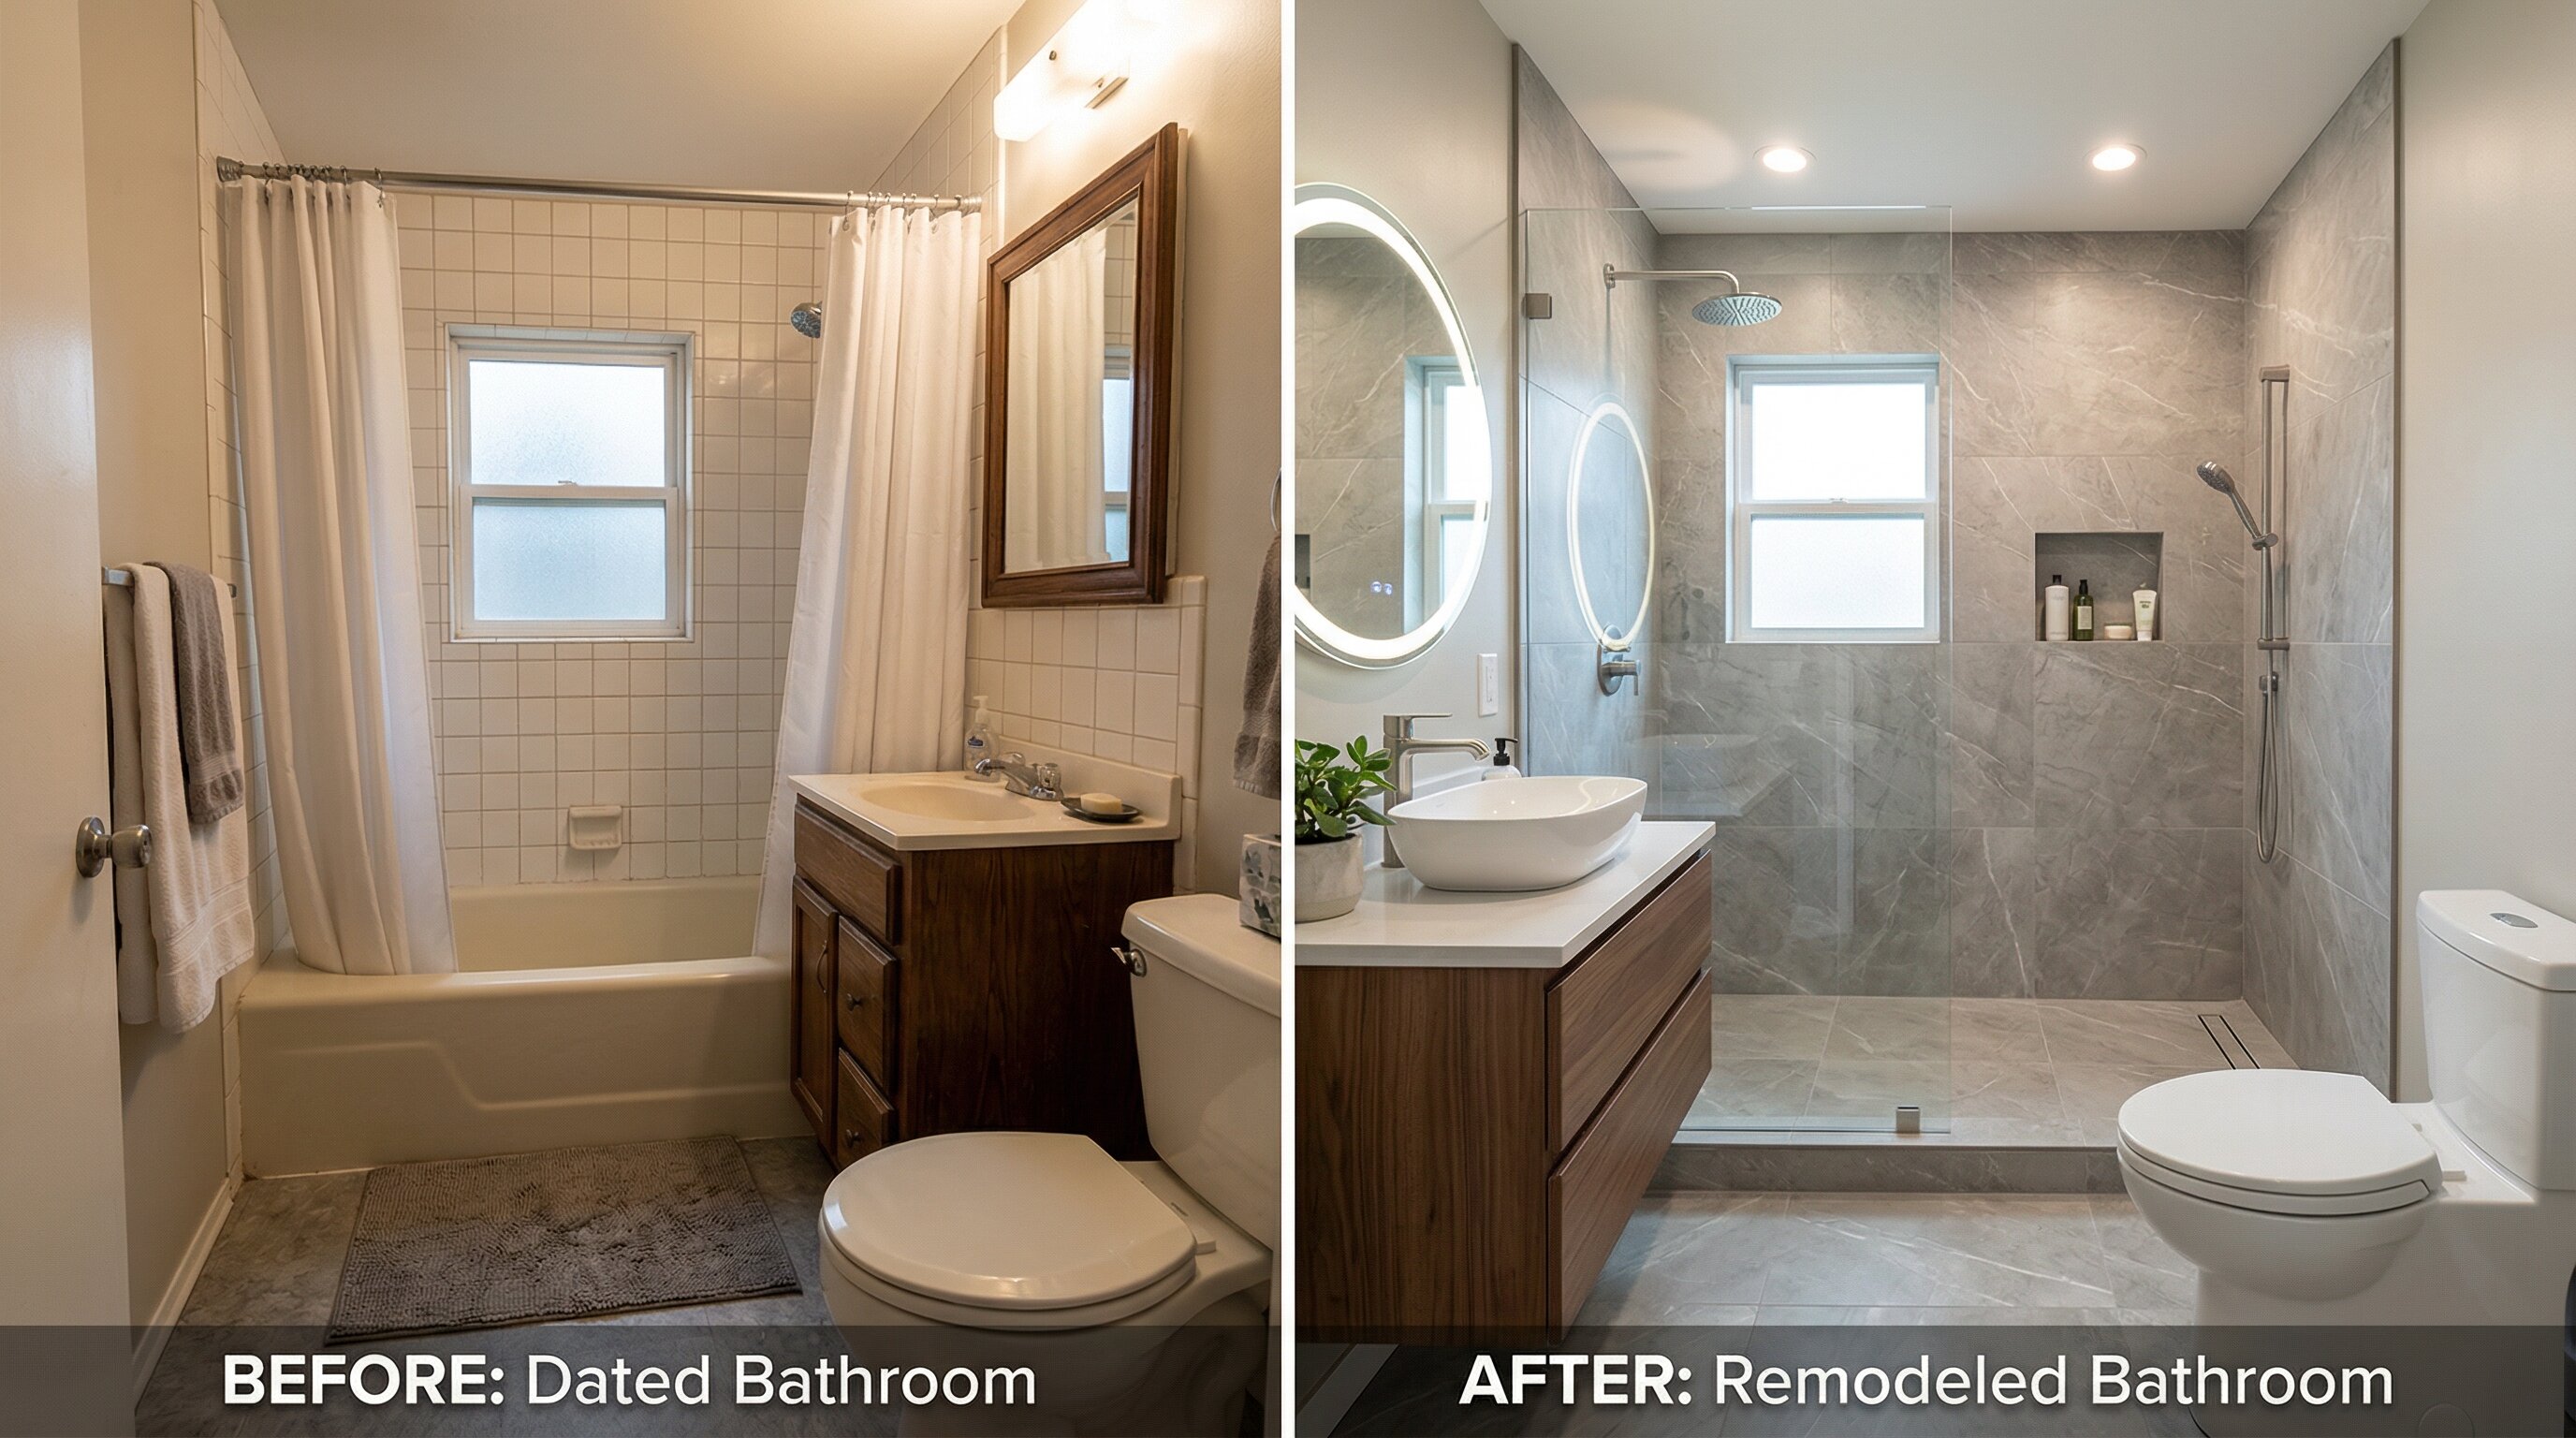
Tub-to-Walk-In Shower Conversion Ideas
Here are few best Walk-In Shower conversion ideas:
Space and Layout: Tub vs Walk-In Shower Footprint
The standard bathtub occupies a 60×30 inch footprint 12.5 square feet. Removing it makes the full area available. A 36×60 walk-in shower fits within a standard tub alcove. It provides a more comfortable experience than the 36×36 minimum.
When to Convert a Tub to a Walk-In Shower
Convert when the tub is unused, when the bathroom is a master bath, or when accessibility is the priority. Keep the tub in a single-bathroom home. Removing it can reduce the buyer pool, especially for families with children.
Installation, Timeline, and ROI Considerations
The tub drain position usually differs from a shower drain. This requires relocation and permits.
Drain relocation adds one to three days of labor. A custom tiled shower takes one to three weeks.
An acrylic panel system installs in one to two days because it skips waterproofing and curing phases.
Bathroom remodels return 60 to 70 percent of their cost on average. Walk-in showers are preferred by buyers over 35 in a primary bath.
Accessible Walk-In Shower Ideas
Curbless Entry and Barrier-Free Design
The curbless entry is the foundation of accessibility. It removes thresholds, trip hazards, and barriers for walkers or wheelchairs.
Grab Bars and Safe Installation
Grab bars mount at 33 to 36 inches from the floor into proper blocking or load-rated substrate. Suction-cup bars are not safe for long-term use.
Control Placement and Reach Range
Position handheld showerheads and controls at 48 inches or lower. This keeps them reachable from the ADA bench height of 17 to 19 inches.
ADA Walk-In Shower Dimensions and Layout
A roll-in shower requires a minimum 36×60 inch floor area and a 36-inch clear entry opening.
Safety Features and Temperature Control
A thermostatic valve prevents scalding during temperature changes. It is essential for ADA walk-in showers.
Caregiver-Friendly Walk-In Shower Design
An open layout and barrier-free entry reduce physical strain on caregivers. This is often overlooked but critical in accessible design.
Frequently Asked Questions
What is the minimum size for a walk-in shower?36×36 inches per the IBC. The practical comfortable minimum is 36×48 inches. Doorless designs require at least 36×48.
What tiles are best for walk-in showers?Porcelain with water absorption below 0.5 percent per ANSI A137.1 and R10 slip resistance for floors. Natural stone requires sealing every one to two years.
Is a walk-in shower a good idea for small bathrooms?Yes. Corner or alcove layouts with frameless glass and large format tile reduce visual interruptions and make the space feel larger.
Do walk-in showers increase home value?Neutral to positive in a master bathroom. Negative in a single-bathroom home if the only tub is removed. Average return is 60 to 70 percent.
How much does a walk-in shower remodel cost?Basic: $3,000–$6,000. Mid-range: $8,000–$15,000. Luxury: $20,000–$40,000+. Tub-to-shower conversion adds $1,000–$3,000 if drain relocation is needed.
Conclusion
A successful walk-in shower remodel comes down to smart planning, not just design choices. Focus on the right dimensions, layout, and materials to ensure long-term performance. When each decision is made in the right order, the result is a space that looks better, works better, and lasts longer.