A water stain on the ceiling below an upstairs bathroom is caused by one of four sources: a plumbing supply or drain leak, a failed toilet wax ring, a shower or tub drain assembly failure, or bathroom condensation from inadequate ventilation. When the stain appears tells you which source to check first this single observation cuts diagnostic time from hours to minutes. A brown water stain on the ceiling that grows after each shower points directly to a drain or supply line; one that appears only during heavy rain points to roof flashing, not plumbing. Acting within 48–72 hours of first noticing a stain is critical: sustained moisture above a drywall ceiling enables mold colonization within 24–48 hours.
What Does the Stain Pattern Tell You?
Before inspecting a single pipe, observe the stain for 24–48 hours.
A stain that has stopped growing and dried completely may be an old leak that self-resolved but the damage it caused to drywall and framing remains and must still be assessed.
What Causes a Ceiling Leak From the Upstairs Bathroom?
Failed Toilet Wax Ring
The wax ring seals the toilet horn to the drain flange at the floor. A leaking wax ring toilet deposits water directly onto the subfloor with every flush the water travels through floor framing and presents as a water stain on the ceiling below the bathroom without any visible water on the upstairs floor surface. The stain typically appears as a yellow-brown ring that grows slightly with each flush cycle. Confirm with the food dye test: add red food coloring to the toilet bowl, flush, and check the ceiling below within five minutes. Red-tinted staining confirms the toilet as the source. Wax ring replacement costs $90–$200 with plumber labor.
Shower or Tub Drain Assembly Failure
A leaking shower drain gasket, the rubber seal between the drain body and the shower pan or tub floor allows every shower's drain water to bypass the drain pipe and seep into the floor cavity. Water leaking through the ceiling after shower use that stops between uses almost always traces back to the drain assembly rather than supply lines. The drain flange, overflow plate gasket on a bathtub, and drain shoe connection are the three most failure-prone joints. Access is typically through the ceiling below or an access panel behind the tub wall. This is a plumber repair misaligned or corroded drain connections that require proper re-seating to hold.
Supply Line or Hidden Pipe Leak
Pinhole leaks in copper supply lines, corroded galvanized steel fittings, and loose compression joints in the upstairs bathroom floor cavity produce a steady or slow-drip stain with no clear fixture timing pattern. Ceiling drywall water damage from a supply-side leak is often more extensive than from drain-side leaks because supply lines are always pressurized they leak continuously, not only during fixture use. Confirm by shutting off all fixtures and watching the water meter: any meter movement over 30 minutes with everything off indicates an active supply leak. A licensed plumber uses pressure testing to isolate the failing section without unnecessary wall demolition.
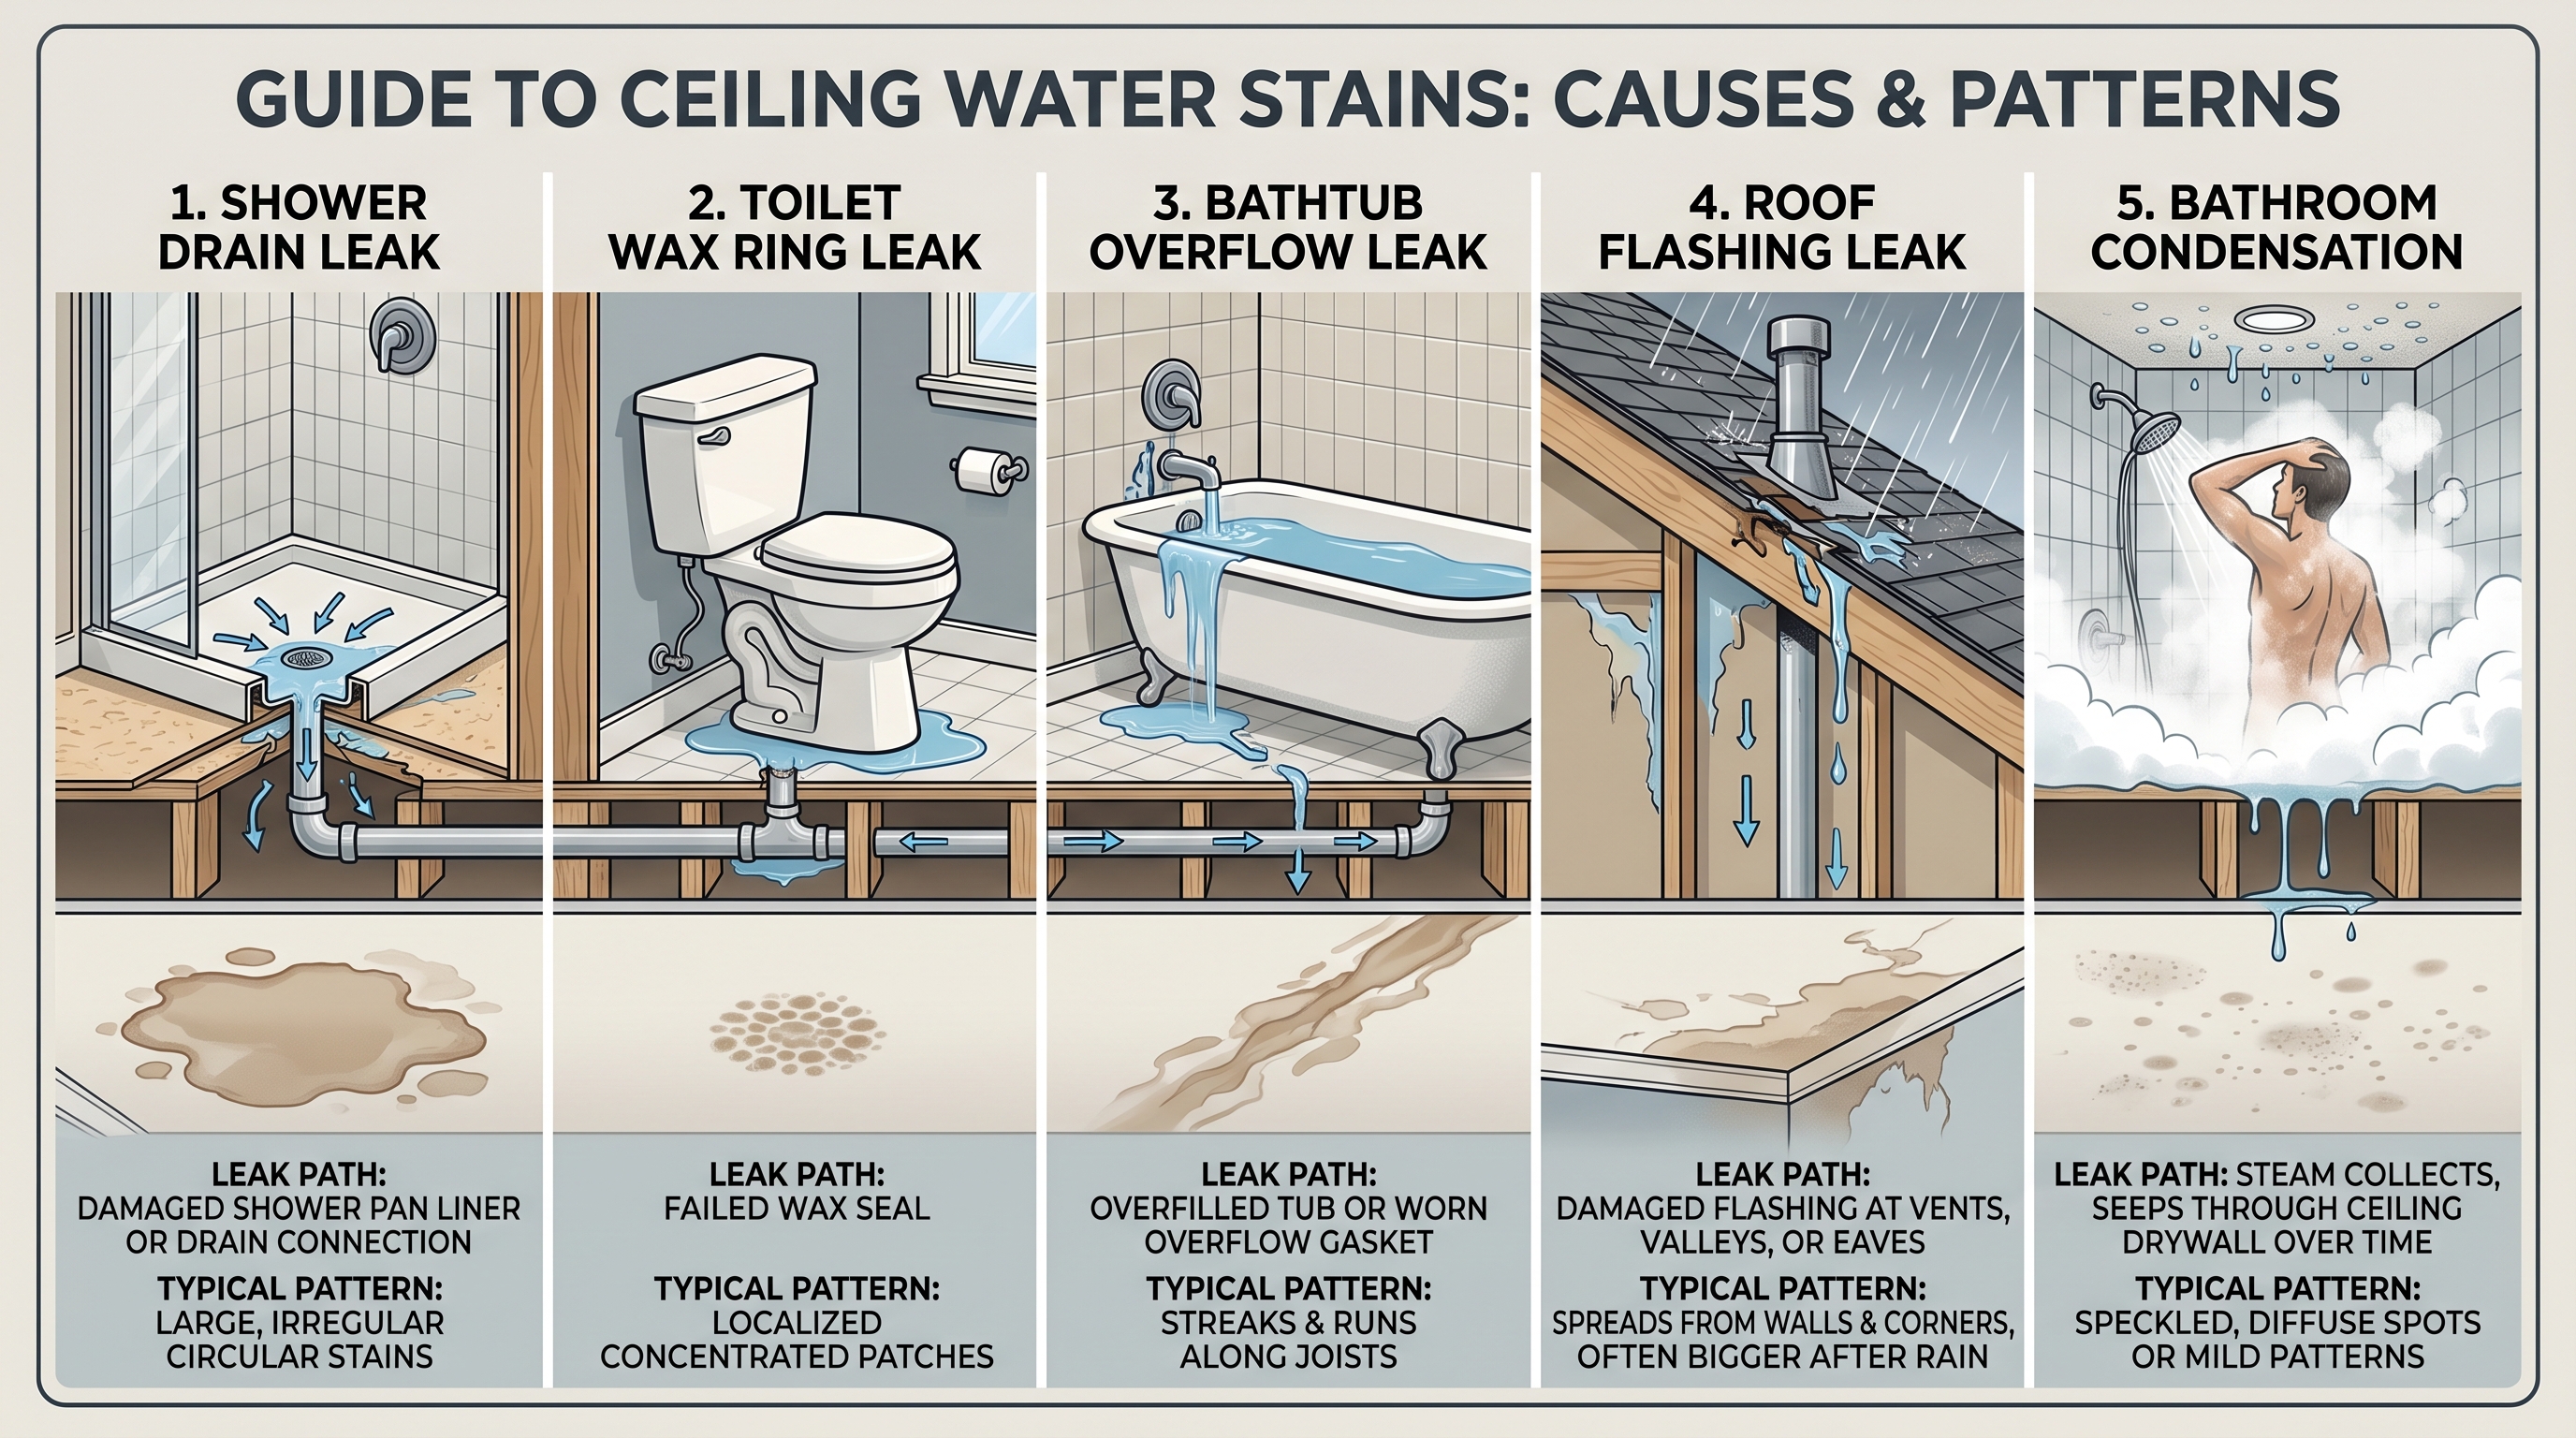
Bathroom Condensation and Exhaust Fan Failure
Not every brown water stain on the ceiling below a bathroom is a plumbing leak. Bathroom condensation ceiling stain forms when a bathroom exhaust fan fails to clear post-shower humidity warm moist air contacts the cooler ceiling surface, condenses, and over weeks creates a diffuse yellowish stain typically centered under the light fixture or fan grille. A secondary mechanism: bathroom exhaust fan condensation inside a poorly insulated or kinked flex duct allows condensate to drip back onto the ceiling framing below. Distinguish condensation from a pipe leak by placing dry paper towels on the ceiling stain area overnight with no shower use a condensation stain stays dry; a plumbing leak produces fresh moisture regardless of fixture use.
How to Diagnose and Fix a Ceiling Stain Below the Upstairs Bath
Follow this sequence before opening any wall or ceiling:
Observe timing : use the table in Section 2 to identify the fixture pattern
Toilet dye test : red food coloring in the bowl; flush; check ceiling within 5 minutes
Paper towel test : tape dry towels to the stain; check after 24 hours with no shower use
Water meter test : all fixtures off; check meter movement over 30 minutes
Run shower only : watch ceiling from below during a full shower cycle; dripping confirms drain or supply
Check exhaust fan duct : disconnect duct at housing; confirm it runs to exterior, not into floor cavity
If source confirmed as plumbing : turn off the relevant supply line; call a licensed plumber
Do not patch the ceiling stain until the leak source is fully repaired and dry painting over an active moisture source traps water in the drywall and accelerates structural rot and mold growth
Ceiling repair after a confirmed and fixed leak: treat the stain with a shellac-based primer to block tannin bleeding, then apply two coats of mold-resistant ceiling paint. If the drywall is soft, bubbling, or crumbles when pressed, full drywall panel replacement is required before any painting.
For any plumbing leak inside a floor cavity, inside a wall, or involving drain assembly re-seating, a licensed plumber is required. Nationwide Builders connects homeowners with vetted local plumbers and contractors who diagnose ceiling leaks from above before opening ceilings unnecessarily preventing the most common and costly mistake in ceiling stain repair.
Frequently Asked Questions
How do I know if the ceiling stain is from a plumbing leak or condensation?
The paper towel test resolves this without any tools. Tape completely dry paper towels to the stain area for 24 hours with no shower use in the upstairs bathroom. If the towels show fresh moisture, a plumbing leak is active condensation that does not produce moisture between shower sessions. A condensation stain remains dry between uses and typically appears as a diffuse, pale yellow ring centered near the exhaust fan rather than a sharp-edged brown stain over a specific fixture location. Condensation stains also tend to appear in winter when temperature differentials across the ceiling are greatest.
Is a water stain on the ceiling below the bathroom dangerous?
Yes, in two ways. An active leak saturating drywall enables mold growth within 24–48 hours. Second, sustained moisture in floor framing causes wood rot that progressively weakens the structural floor above a failure that can ultimately compromise the ability of the floor to support bathroom fixtures. Water damage ceiling mold and structural floor rot are both significantly more expensive to remediate the longer the leak continues. A fresh stain costs $200–$500 to repair after the leak is fixed; mold remediation plus structural repair in a neglected case runs $3,000–$10,000+.
Can I fix a water stain on the ceiling myself?
Cosmetic ceiling repair priming and repainting a dried stain after the leak is confirmed fixed is a DIY task. Use shellac-based primer (not latex) to seal the tannin stain before painting, or the brown ring bleeds through every subsequent coat. However, diagnosing and repairing the leak source itself, particularly drain assembly re-seating, wax ring replacement, or hidden pipe repair requires a licensed plumber. Painting over an unresolved leak does not fix it; it hides it until the drywall fails completely.
How much does it cost to fix a ceiling leak from an upstairs bathroom?
Costs depend entirely on the source. Wax ring replacement runs $90–$200 with labor. Shower drain gasket repair or re-seating runs $150–$350. A supply line pinhole repair costs $200–$500 depending on access. Drywall ceiling patch after a confirmed fixed leak costs $150–$400 per section. If the floor framing or subfloor is damaged and requires replacement, costs rise to $1,000–$3,500. Early diagnosis at the first appearance of the stain is the single most effective cost-control action available to a homeowner.