Grab Bar Installation: Heights, Anchoring & Costs (2026 Guide)$150 - $297
Average fixed price
Grab Bar Installation: Heights, Anchoring & Costs (2026 Guide)
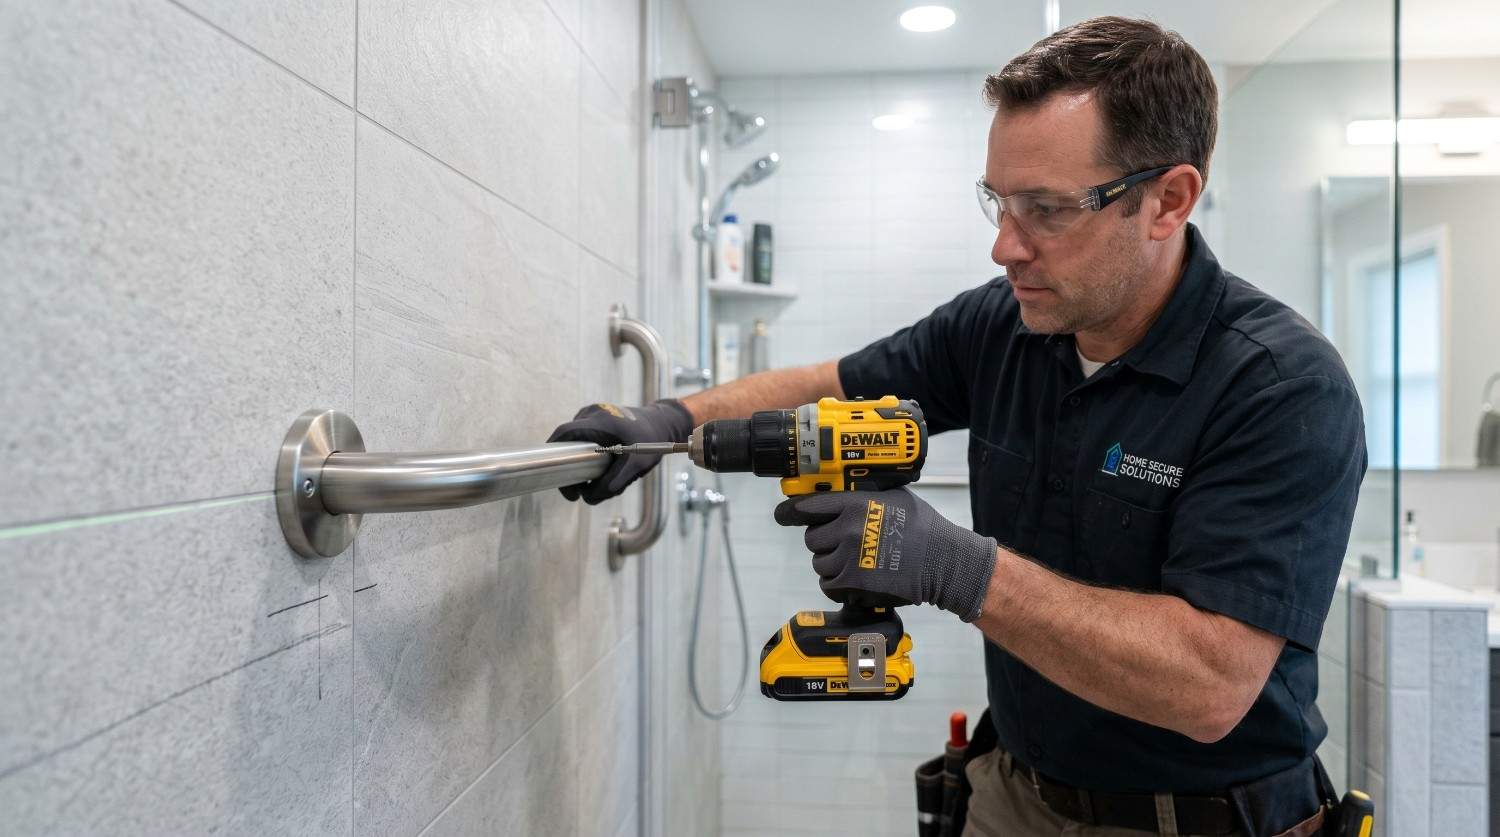
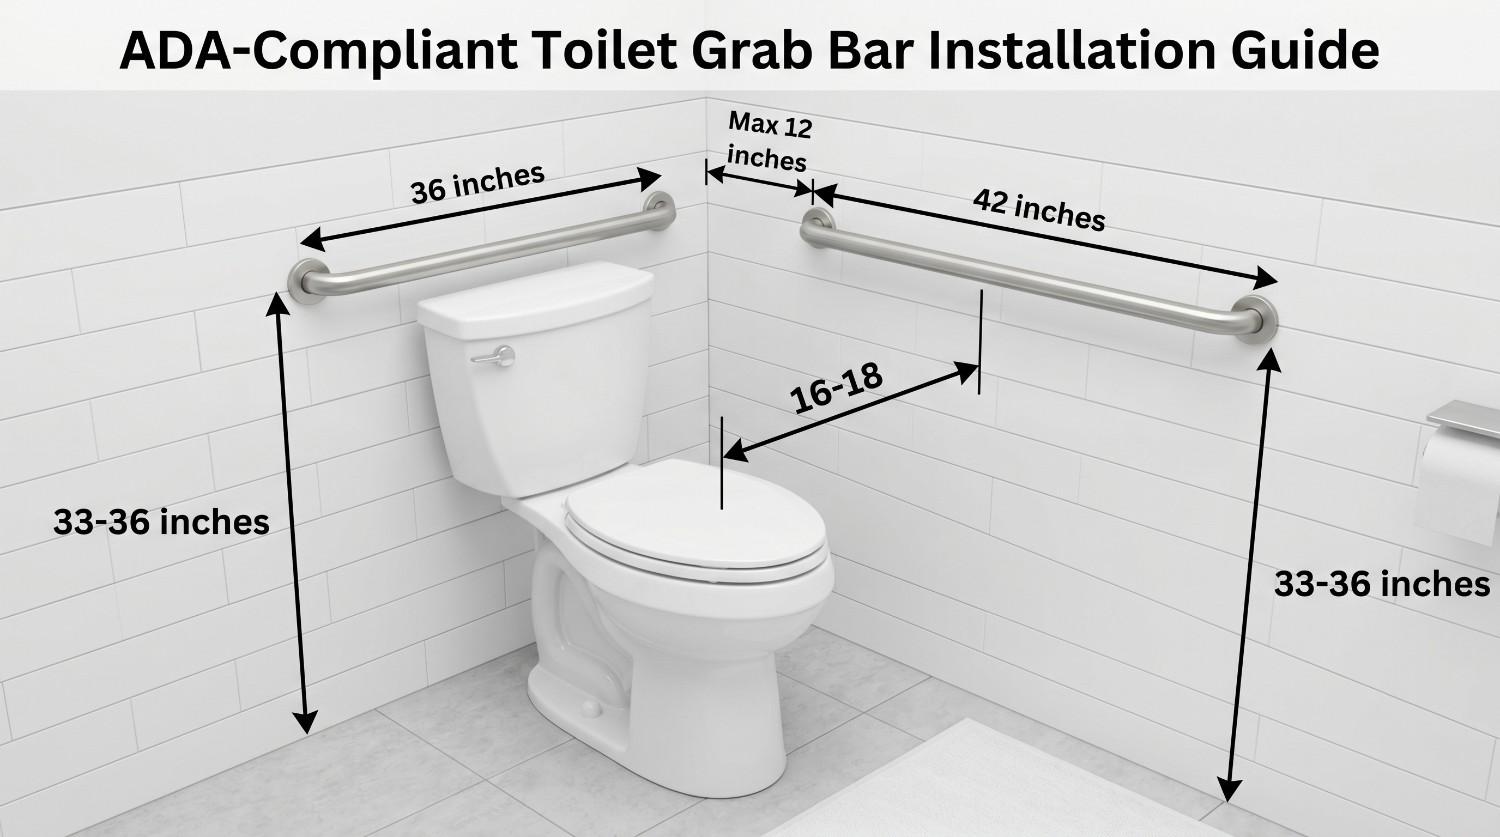
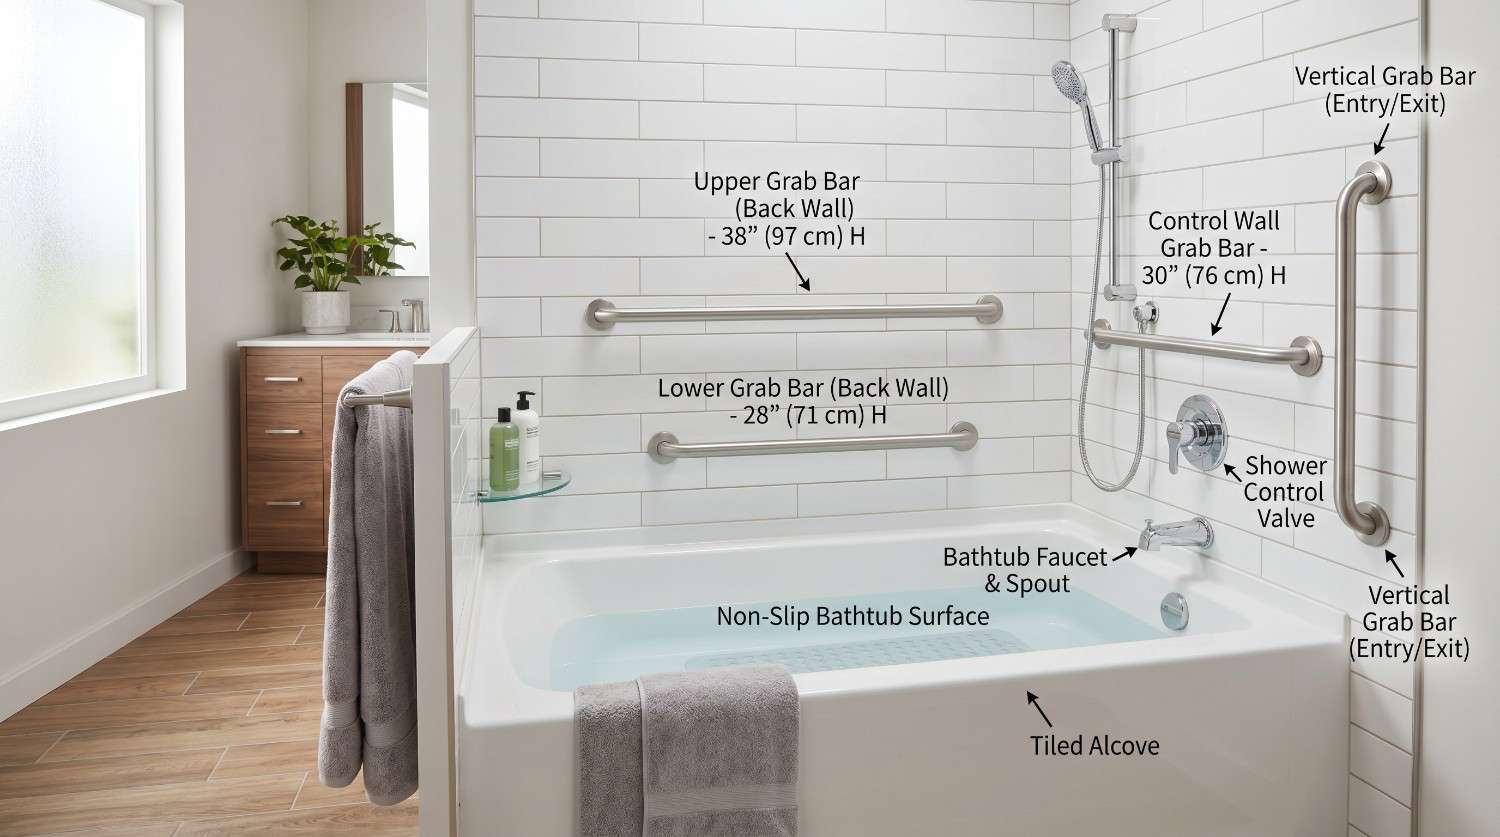
A grab bar that pulls out of the wall during a fall is not a safety device, it is a hazard. Someone reaching for support in a wet shower applies sudden, unpredictable force. If the bar isn't anchored into something structural, it fails at exactly the moment it matters most, and the person falls harder and further than they would have without it. That is why anchoring not placement, not height, not style is the first thing to understand about grab bar installation. Every grab bar installation has one job: hold 250 pounds of force applied suddenly, at any angle. How reliably it does that job depends entirely on what the bar is fastened to. Use this hierarchy, in order: Screws driven directly into wall studs provide the most secure and durable anchor. You need at least 1.5 inches of screw penetration into the stud. Most grab bar mounting flanges require three to four screws per end all into solid wood. A 2×4 or 2×6 spanning between two studs, installed when the wall is already open, creates a solid backer across any mounting location. Blocking is the right answer when walls are exposed during a bathroom remodel it costs almost nothing to add at rough framing stage. Retrofitting blocking after the wall is closed requires opening the drywall, patching, and refinishing, adding $80–$200 in repair cost. Products like WingIts and Moen SecureMount are engineered specifically for grab bar loads in hollow walls. They distribute weight across a larger area of the substrate. These are the correct anchors when no stud is present, not general-purpose drywall anchors. The SNAPTOGGLE toggle bolt has been independently tested to 360 lbs in half-inch drywall. When the correct type is used correctly, toggle bolts can meet the 250-lb standard. However, load capacity decreases with repeated use, and incorrect selection or installation creates a pull-out risk. Standard drywall anchors (never). Plastic expansion anchors the kind sold in generic hardware packs do not provide adequate load capacity for grab bars. They degrade under repeated stress. Do not use them. Suction cup grab bars are not grab bars. They are bath accessories. A suction cup creates a seal against a smooth surface; that seal breaks without warning when the surface is wet, soapy, or subjected to sideways force. Do not install suction cup bars as fall prevention devices. They create a false sense of security that is more dangerous than no bar at all. The shower is the highest-fall-risk zone in the home. Installing grab bars here correctly is the most impactful single safety upgrade in a bathroom. The ADA standard for shower grab bar height is 33–36 inches from the shower floor to the top of the gripping surface. For residential installation, this range applies whether ADA compliance is legally required or not; it is the height at which most adults can use a bar effectively for both balance and rising support. In a transfer-type shower stall, the grab bar should run across the full length of the control wall and along the back wall to at least 18 inches from the control wall. The bar should be no more than 6 inches from adjacent walls. Installing on tile is the most technically demanding version of this job. Tile can crack, and a cracked tile in a shower surround is both an aesthetic and a water-damage problem. Mark the location using a level. Confirm the bar is at 33–36 inches from the shower floor. Find the studs using a stud finder. Note: stud finders are less reliable through tile and cement backer board take multiple readings and verify with a small test hole if uncertain. Check for plumbing before drilling. Avoid walls with supply lines or drain connections. Use a diamond-tipped drill bit for tile. Standard drill bits crack ceramic and porcelain. Drill at slow speed to reduce heat buildup. Keep a damp cloth on the tile surface to cool the bit. Apply silicone sealant behind each mounting flange before tightening. This is non-negotiable in a wet area. Water that infiltrates behind a flange will rust fasteners and damage the wall structure over time. Fasten into studs where they align with your chosen location. Where studs are not present, use WingIts or equivalent specialty anchors not toggle bolts in tile, which require a large hole that significantly weakens the tile. Force test every installation: push, pull, and twist the bar firmly in all directions. Any movement at all means the installation is incomplete reinstall before use. Two bars serve most toilet applications: The side wall bar is the more important of the two it supports transfers from a wheelchair and provides rising support from the toilet seat. Bathtub A bathtub requires bars in two positions on the back wall plus the control end wall: The lower back-wall bar is specifically for entry and exit over the tub wall. The upper bar supports balance while standing in the tub. Both are needed for full coverage. Grab bars are increasingly installed in hallways and on stair approaches for broader aging-in-place safety. The same anchoring rules apply. Height: 33–36 inches, at a point where a person can reach while maintaining balance. Residential note: ADA requirements are legally mandatory in commercial and public spaces. In private residences, they are not required but they represent the safest, most widely tested specifications and should be used as the installation standard regardless. Grab Bar Installation Cost (2026) Most professional grab bar installations take 20–45 minutes per bar. Tile surfaces, tight spaces, and hollow-wall anchoring add time. Bundling multiple bars in one visit typically reduces the effective per-bar cost significantly. Some health insurance plans, Medicare, and Medicaid may cover grab bar installation when there is a documented medical need. You will need: A doctor's prescription stating the medical necessity Itemised invoices from the installer Prior authorisation from the insurer in many cases Check with your insurer or primary care provider before installation if you believe you may qualify. DIY is reasonable when: You are installing on drywall with accessible studs You own or can borrow a drill, stud finder, and level You are confident identifying stud locations The bar is not in a tiled area Always hire a professional for: Any tiled surface (tile cracking risk requires diamond bit and technique) Fiberglass or acrylic tub surrounds (cracks very easily) Any installation where you cannot locate studs confidently When ADA compliance documentation is needed When the user has significant mobility limitations (the cost of an incorrect install is too high) The professional fee of $150–$300 per bar is, in most cases, genuinely worth paying. You are not paying for the physical task of drilling and fastening. You are paying for the knowledge of what to fasten to, how to verify it holds, and what to do when the wall does not cooperate. If you are planning any bathroom renovation, new tile, new fixtures, any scope that requires the walls to be opened add grab bar blocking at the rough framing stage. A 2×4 or 2×6 nailed between studs behind the planned installation area costs almost nothing when the wall is open. Retrofitting blocking once the wall is closed and tiled costs $80–$200 in drywall and tile repair, plus additional labour. Plan for grab bars before you need them. ADA standard is 33–36 inches from the shower floor to the top of the gripping surface. This applies in residential bathrooms as a best-practice guide even when ADA compliance is not legally required. Yes, but only with the correct hollow-wall anchors. WingIts and Moen SecureMount are specifically engineered for grab bar loads. Standard drywall anchors are never suitable. Toggle bolts with the correct specification (SNAPTOGGLE type) are acceptable as a last resort. Most homeowners pay $100–$400 per bar for professional installation including the bar and labour. Multiple bars in one visit reduce the effective per-bar cost. Labour rates run $50–$125 per hour. No. ADA requirements are mandatory for commercial and public spaces. Private residences are not required to comply, but the ADA specifications are the safest practical guide and should be followed regardless. A grab bar is permanently anchored to the wall structure and engineered to hold 250 lbs of sudden force. A suction cup bar uses a vacuum seal that can fail without warning, especially on wet or soapy surfaces. Suction cup bars are not safety devices and should not be used for fall prevention.The Anchoring Hierarchy: What Goes Behind the Wall
1. Wood stud (best).
2. Blocking (second best).
3. Specialty hollow-wall anchors (acceptable when no stud).
4. Toggle bolts (last resort, acceptable).
The Suction Cup Warning
Shower Grab Bar Installation
Shower Grab Bar Height
How to Install Grab Bars in a Tiled Shower
Bathroom Grab Bar Installation: Placement by Location
Toilet
Hallways and Stairs
ADA Grab Bar Specifications (Quick Reference)
Can Insurance or Medicare Cover the Cost?
DIY vs Professional Installation
The Remodel Timing Rule
Frequently Asked Questions
What height should shower grab bars be installed at?
Can I install grab bars without hitting a stud?
How much does professional grab bar installation cost?
Are grab bars required by law in a residential bathroom?
What is the difference between a grab bar and a suction cup bar?